
Step 1: Create the Driver (also known as a Service Resource)
Step 2: Assign the Service Resource to a Service Territory
Step 3: Update the Service Resource's operating hours on their member record in the territory to which they belong
Creating the Driver (Service Resource)
If you would like to create a new Service Resource (commonly referred to as a driver), you can do so as long as you have access to the Field Service Admin application.
Choose Application
- Locate and click on the App Launcher located on the far-left side of the page, just below the Salesforce Blue Cloud. This should look like 9 dots.
- In the search field, type Field Service Admin and select it from the list.

Creating Service Resource (Drivers) from a Contact record
- If enabled in your Salesforce Org, you can create a Driver from an action button located on the Contact record.
- Search for and select the volunteer you're working with using the Global Search Bar
- Open the Contact record of who you would like to create as a Driver, and click the Create A Driver button in the upper right corner of the page (if you do not see the Create A Driver button, click the down arrow next to the buttons and select from the dropdown).
- Fill out the First Name, Last Name, and email if not already filled in. Click Next.

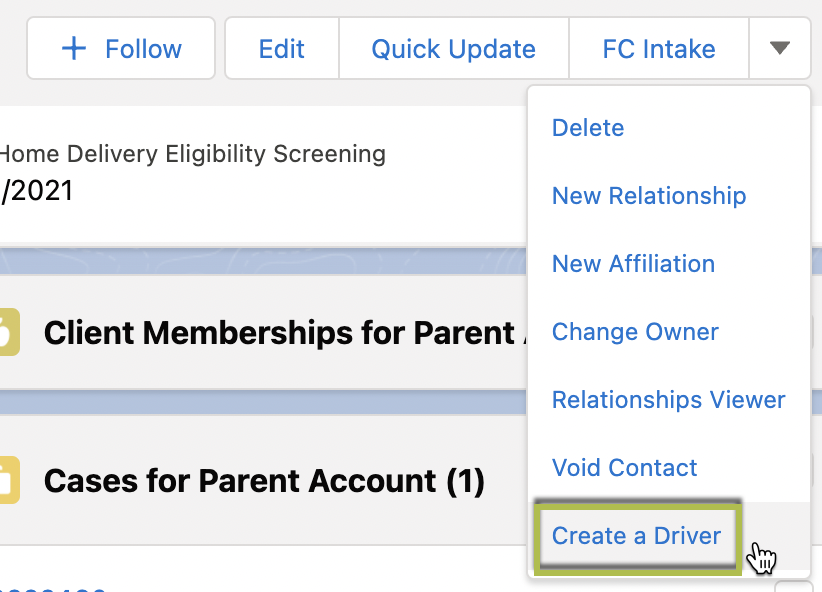

- The Contact's name should show up under the Name field. Then, copy this information into the Gantt Label field.
- Click Next.

Creating Service Resources (Drivers) Manually
- Locate and select Field Service Settings on the Navigation Bar.
- Locate the Getting Started section and click on the Go to Guided Setup button.
- Click on the Create Service Resources link on the left side of the page (item number 3).
- Select User by filling all fields in the New Service Resource section.
- Click Add.
- Once Users are added, find the column next to their name called Licenses and click on the icon that looks like a phone and a computer to assign the user both desktop and mobile access.


Notes:
- You can quickly activate/deactivate licenses by clicking on the Computer/Mobile icons on the right side of the screen (item 6).
- You can quickly activate/deactivate a Service Resource (driver) if needed, by clicking the Active checkbox in for each Service Resource. This would allow you to quickly transfer a license from a Service Resource who is not working that day to a Service Resource who is working.
Assign the new Service Resource to a Service Territory
Update the Service Resource's Operating Hours on their Member record in the Service Territory
Assigning operating hours to service resource records in Salesforce is a little tricky because you can’t assign the operating hours directly on the service resource detail page. This is because, technically, a technician can work in more than one territory.
Therefore, you set a service resource’s operating hours on their member record for each territory they belong to. Still confused? Here it is step by step.
- From the App Launcher, find and select Service Resources.
- Click your name under the Name column.
- Click the Related tab.
- In the Service Territories related list, click New.
- Use the Service Territories lookup to select New York Area. If you sometimes work in another area, you could also add yourself to that service territory, but you’d want to make it a secondary territory type.
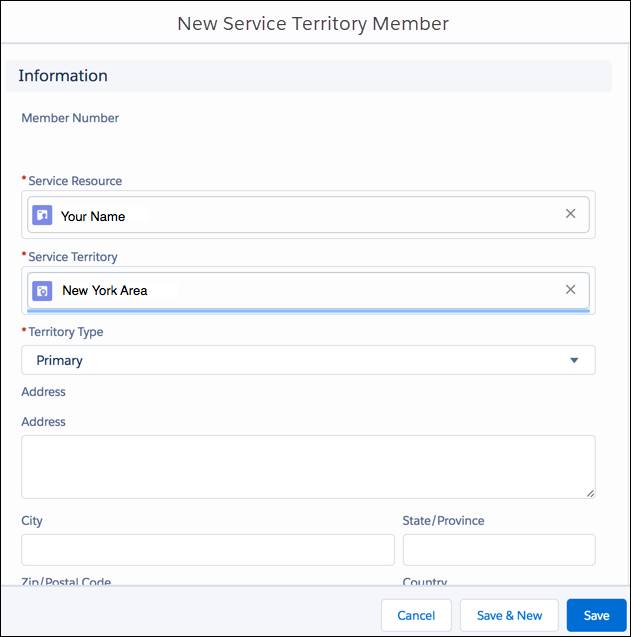
- Use the Operating Hours lookup to select Mon-Fri 8am-5pm (East).
- Enter a start date. For simplicity, click the calendar icon to the right of the dialog to automatically enter today’s date.
- Click Save.